Step-by-Step Timber Deck Restoration Guide for Drummoyne Homeowners
Timber decks add a touch of natural beauty and functionality to any home, creating a space for outdoor relaxation, entertainment, and family gatherings. However, over time, exposure to the elements can take a toll on your deck’s appearance and structural integrity. Drummoyne, with its stunning waterfront views and outdoor lifestyle, is a prime location for timber decks. To ensure your deck remains in top condition, regular maintenance and restoration are essential. In this comprehensive guide, we will walk you through a step-by-step timber deck restoration drummoyne process tailored to Drummoyne homeowners.
The Importance of Deck Restoration
Timber decks in Drummoyne face unique challenges due to the suburb’s coastal location and variable climate. The proximity to the water means decks are exposed to salt air, humidity, and rainfall, all of which can accelerate wear and tear. Regular restoration not only enhances the aesthetics of your deck but also ensures its longevity and safety.
Benefits of deck restoration include:
Enhanced Aesthetics: Restoring your deck can bring back its original beauty, making it an inviting outdoor space for relaxation and entertaining.
Structural Integrity: Regular inspection and restoration can identify and address structural issues before they become costly problems.
Safety: Cracked, warped, or splintered wood can pose safety hazards. Restoration helps eliminate these risks.
Value Enhancement: A well-maintained deck adds value to your property, making it more attractive to potential buyers.
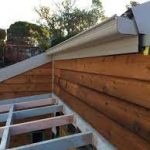
Step 1: Assessment and Planning
Before you embark on the restoration journey, assess the current condition of your deck. Look for signs of wear, rot, or structural damage. Take note of any loose or protruding nails or screws. Determine the type of wood used in your deck, as different woods require different restoration approaches.
Tips:
Use a screwdriver to probe areas that appear soft or discolored. Softness indicates rot.
Inspect the deck’s substructure, including joists and beams, for structural integrity.
Once you’ve assessed your deck, create a restoration plan. Decide on the extent of restoration needed, including whether you’ll focus on cleaning and sealing or if repairs and sanding are required.
Step 2: Cleaning the Deck
Cleaning is a crucial first step in timber deck restoration. Over time, decks accumulate dirt, grime, mold, and mildew, which can affect both appearance and structural integrity. There are two primary methods for cleaning your deck: pressure washing and manual cleaning.
Pressure Washing:
Pressure washing is an effective way to remove deep-seated dirt and stains. However, it must be done carefully to avoid damaging the wood. Use a pressure washer with a fan tip, and maintain a consistent distance to prevent gouging or splintering.
Manual Cleaning:
Manual cleaning involves scrubbing the deck with a mixture of water and a deck cleaner or a mild detergent. Use a stiff brush to scrub away dirt and stains. Rinse thoroughly with a hose.
Tips:
Always wear protective gear, including safety glasses and gloves, when cleaning with chemicals.
Ensure the deck is completely dry before proceeding to the next steps.
Step 3: Sanding and Stripping
Sanding is essential for removing any remaining old finish, smoothing out rough spots, and preparing the wood surface for sealing or staining. The extent of sanding needed depends on the condition of your deck and your restoration goals.
Sanding Equipment:
Orbital sander for flat surfaces.
Detail sander or sanding block for edges and corners.
Sandpaper with varying grits (start with coarse grit and progress to finer grits).
Tips:
Sand in the direction of the wood grain to avoid creating scratches.
Remove all dust and debris before proceeding to the next step.
Step 4: Repairs and Replacements
Inspect the deck again for any damaged or rotting boards, loose fasteners, or structural issues. Replace any severely damaged boards and tighten or replace loose screws or nails. Ensure that the deck’s substructure is stable and free from rot.
Tips:
Use treated lumber for any replacements to prevent future rot.
Secure boards with galvanized screws or deck-specific fasteners for durability.
Step 5: Sealing or Staining
Sealing or staining your deck is crucial for protecting the wood from moisture, UV rays, and general wear and tear. Choose a high-quality deck sealer or stain suitable for the timber type used in your deck.
Application Methods:
Brush: Ideal for control and precision.
Roller: Quick and efficient for larger areas.
Sprayer: Provides even coverage but requires skill to avoid overspray.
Tips:
Apply the sealer or stain evenly, following the wood’s grain.
Allow sufficient drying time between coats, as recommended by the product manufacturer.
Step 6: Finishing Touches
Once the sealer or stain is dry, consider these finishing touches to enhance the aesthetics and longevity of your deck:
Deck Furniture: Invest in outdoor furniture that complements your deck’s style and provides a comfortable outdoor living space.
Outdoor Rugs: Outdoor rugs not only add a cozy touch but also protect the wood surface from scratches and wear.
Potted Plants: Incorporate potted plants and flowers to add color and vibrancy to your deck.
Regular Maintenance: Schedule regular maintenance tasks like cleaning and resealing to keep your deck in pristine condition.
Conclusion
Timber decking marrickville is a rewarding endeavor for Drummoyne homeowners. With the right assessment, planning, and execution, you can breathe new life into your deck, creating an inviting outdoor space for relaxation and entertainment. Regular maintenance and restoration not only enhance the aesthetics of your deck but also ensure its longevity and safety, making it a valuable addition to your Drummoyne home for years to come.